
DNS Manager Help
Adding a Domain to your Profile
Click Add New Domain from the Domain List screen to add a new domain to your profile. New domains added to your profile will not automatically be activated in our DNS system.
To activate a domain, have your credit card handy and click on the domain name to bring up the Records List screen and then click on the Activate Your Domain here link.
Adding Records to a Domain
From the Domain List screen, click on the domain name you wish to add records to. The Records List screen for the domain you selected is now displayed. You can now click on one of the records to edit it, or click on Add New Record to add a new record to your domain.
Available Record types:
- A Records are an address record. This points to servers like web (www), ftp, mail, etc. Its ok to have multiple A Records pointing to the same IP address.
- MX Records: Tells other mail servers which mail server is responsible for receiving mail for your domain. Make sure your FQDN is your domain name and not a host name. ie: lanechange.net not www.lanechange.net
- CNAME records: are alias records. Kind of a name that points to a name that then gets looked up as a number. CNAME’s should point to domains you do not have DNS control over, as these records force two lookups to take place, slowing name resolution.
- TXT Records (advanced record type): A TXT record returns a string of text when queried. This returned data can be an SPF or Domain Keys string, or any string you need for your particular requirement. To add a string to a TXT record, type your string into the ‘Server Name’ box. You can only create one TXT record per FQDN. For now, FQDN’s must be valid Internet Host names.
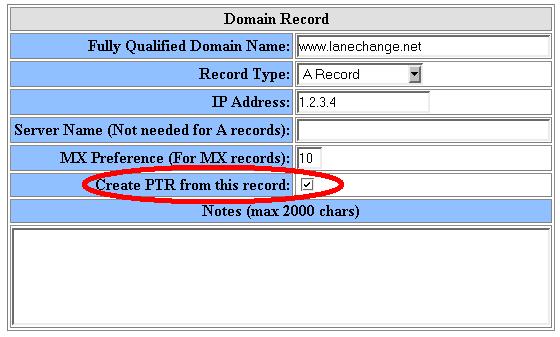
- PTR Records (advanced record type): PTR records map IP addresses to hostnames. PTR Records can be created out of an A or MX records that have IP addresses by clicking on the “Create PTR from this record” checkbox (see image below).
NOTE: Your ISP must delegate the IP Address resolution to our DNS servers in order for this feature to work. Your domain name has nothing to do with this delegation and ONLY the company that assigned you your IP can give this delegation.
NOTE: You must create a unique Fully Qualified Domain Name for this to work. Automatic creation of pointer records does not work with wildcard hostnames (see next question) or host names that contain the base domain name only.
- NS Records (advanced record type): Used to delegate a portion of your name space (ex: campus1.domain.com) to external name servers. You cannot use NS records for your base domain name (ex: domain.com) as the DNS Manager creates these records for you automatically. If you want to delegate a portion of your name space to another server, enter the name space as the FQDN, select NS record type and enter the Name Server responsible for this name space in the Server Name field.
Wild Cards:
- You can create wild card A records by specifying a * like this: *.lanechange.net and an IP address. This would map <anything>.lanechange.net to a given IP.
- The only fully qualified domain name (that's a computer host name followed by the domain name) that wild cards don't map too is the domain name itself, ie: lanechange.net
- So if you wanted someone to reach your web server by typing just the domain name, without the www you would need to create another A record that has the FQDN of <your domain name> and the IP of your server.
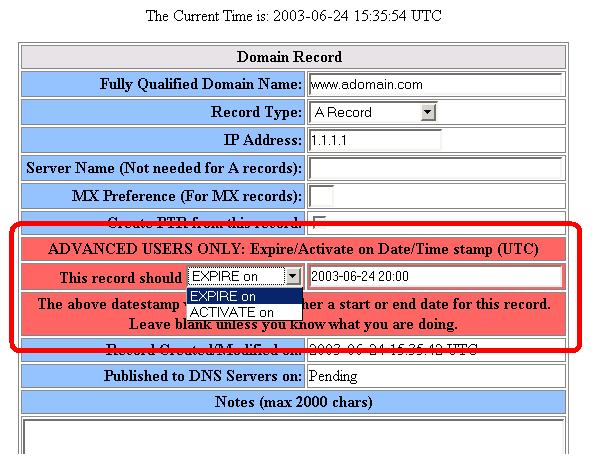
Expire or Activate a record by date & time!
You can now expire a record on a certain date and time, or add a record that only becomes active after a certain date and time. This is an advanced feature and should only be used by those who understand the concept of Time To Live's (TTLs) as used in the DNS environment.
Here is a brief explanation of the concept of TTL's: In order to reduce the delay and traffic involved in a DNS query, a clients computer will point to a local DNS caching server, usually provided by your ISP. This server is responsible for finding and storing (or caching) information about the record you are looking for. If the caching server does not know the answer to your query, it starts a process, that involves several servers, looking up the information you seek from the "authoritative" DNS server(s) for your domain. Because your using our DNS Manager, our network of servers are considered to be ""authoritative" for your domain. When a caching server asks us for information, we return it with an added piece of information, the TTL. This TTL instructs the calling server to remember, or cache, the answer for a set amount of time, after which the caching server can expire the information and if it is needed again at some point in the future, starts the lookup process again.
There are many schools of thought on how long a TTL should be set. Too short a TTL and your clients are forced to deal with the delays involved in getting an answer from an authoritative DNS server, making it appear that your server is slow. Too long a delay and changes made to your records (when you change a servers IP address for example) won’t be visible to caching servers until they expire out the old information.
We chose to keep resource records set to the TinyDNS default values of 24 hours. This allows you to keep your address information up close to your clients, allowing them faster access to your servers, while reducing the delays of recursive resolution. These values work great for most people, most of the time. After all, if your information hasn't changed, why force clients to keep asking for the same information, over and over again, right!? But what happens when you need to change your information? If your changing your servers IP address, you want a seamless transition from the old information to the new. Here is where Expire/Activate time-stamps come in!
In the red section below, you have the ability to set either an expire or activate date for this record. Create two identical records (with different IP's of course!), one with an expiry date, the other with an activate date, set them to the same date stamp and our servers will now dynamically adjust the TTL's for your records so that they are not cached past the exipry time you specify, or activated at the time of your choosing!
Other Notes on the Expire/Activate feature:
- Since our default TTL is 24 hours, be sure to setup your expiring record at least 24 hours in advance, to avoid caching servers from keeping your old information beyond your desired expire time.
- We publish data to our servers 3 times an hour (every 20 mins), keep this in mind when wanting start times less than 20 minutes away.
- All times are UTC, sometimes called GMT. If your not sure what time zone your in, check the top of the Edit Record page, it displays the current time as of when the page was loaded. Compare this to your current time and now you know how far off UTC time you are!
- When a record has an activate or expire entry associated with it, you will see that record highlighted in yellow on the Domain Records Page. This is to remind you that this record has this feature active.
Example Zone configuration:
Here is an example of some domain records for “mydomain.com”. An explanation follows:
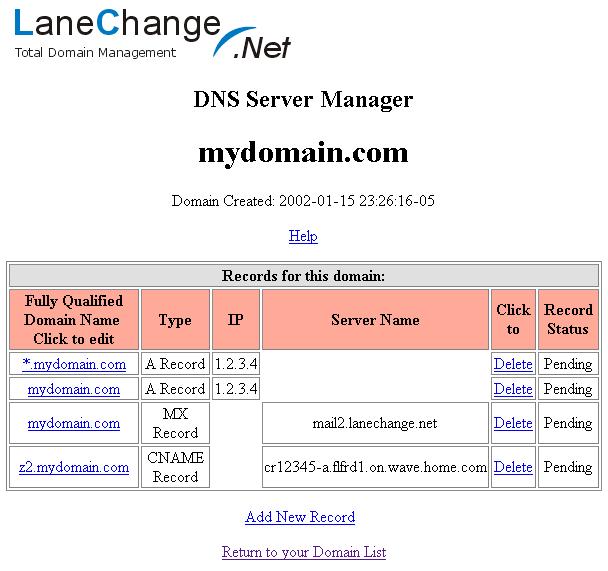
- The first line is a wild card A record, pointing <anything>.mydomain.com to IP address 1.2.3.4
- The second line is also an A record that also points the host name "mydomain.com"to IP 1.2.3.4
- The third line specified that "mail2.lanechange.net" is the Mail Exchanger for the domain “mydomain.com”. Note that the host name “mail2.lanechange.net” must actually be a resolvable host name and is the responsibility of the admin for the “lanechange.net” domain.
- The last line points “z2.mydomin.com” to an “alias” record that points to another domain name that is resolvable by a “home.com” DNS server which would then be used to find the IP address for cr12345-a.flfrd1.on.wave.home.com